# Segway Cloud
# Overview
# Introduction
The Segway Cloud platform provides secure, efficient, and stable interactive services for terminal equipment and application systems. Segway Cloud supports cloud data collection with high downstream device connection capacity. The platform's cloud APIs allow users to remote control their devices through API calls. Segway Cloud also provides other value-added services such as device management, data monitoring, and data analysis for various IoT application scenarios.

# Scope of Functions
Real-time Query
Efficiently query device information with real-time locating, device status check, and Bluetooth key lookup.
Real-time Operations
Real-time device control and parameter configuration functions such as locking, unlocking, boot up, shutdown, and audio playback.
Push
Push ensures that errors, alerts, and external lock statuses are always up to date.
TIP
We use some outbound endpointes to push real-time messages for you.
These interfaces require you to provide a Base URL for receiving push messages in advance. We will concatenate the sub-path of the corresponding message type (that is, the Endpoint declared in the API document) after the base url to form a Complete URL, then push to the complete URL.
Device Management
Vehicle activation and rapid SIM import and management provide a full range of device management solutions.
Firmware Over-The-Air (FOTA)
OTA (over-the-air), Bluetooth and other firmware update solutions.
Data Analysis
A full range of solutions throughout the device lifecycle, including device behavior analysis, request status statistics, battery safety monitoring, and more.
# Quick Start
# 1. Register an Account
- To register, go to the bottom of the official website and fill in your details. The service team will create an account for you.
- You can also contact our sales team directly at sales@segwaydiscovery.com.
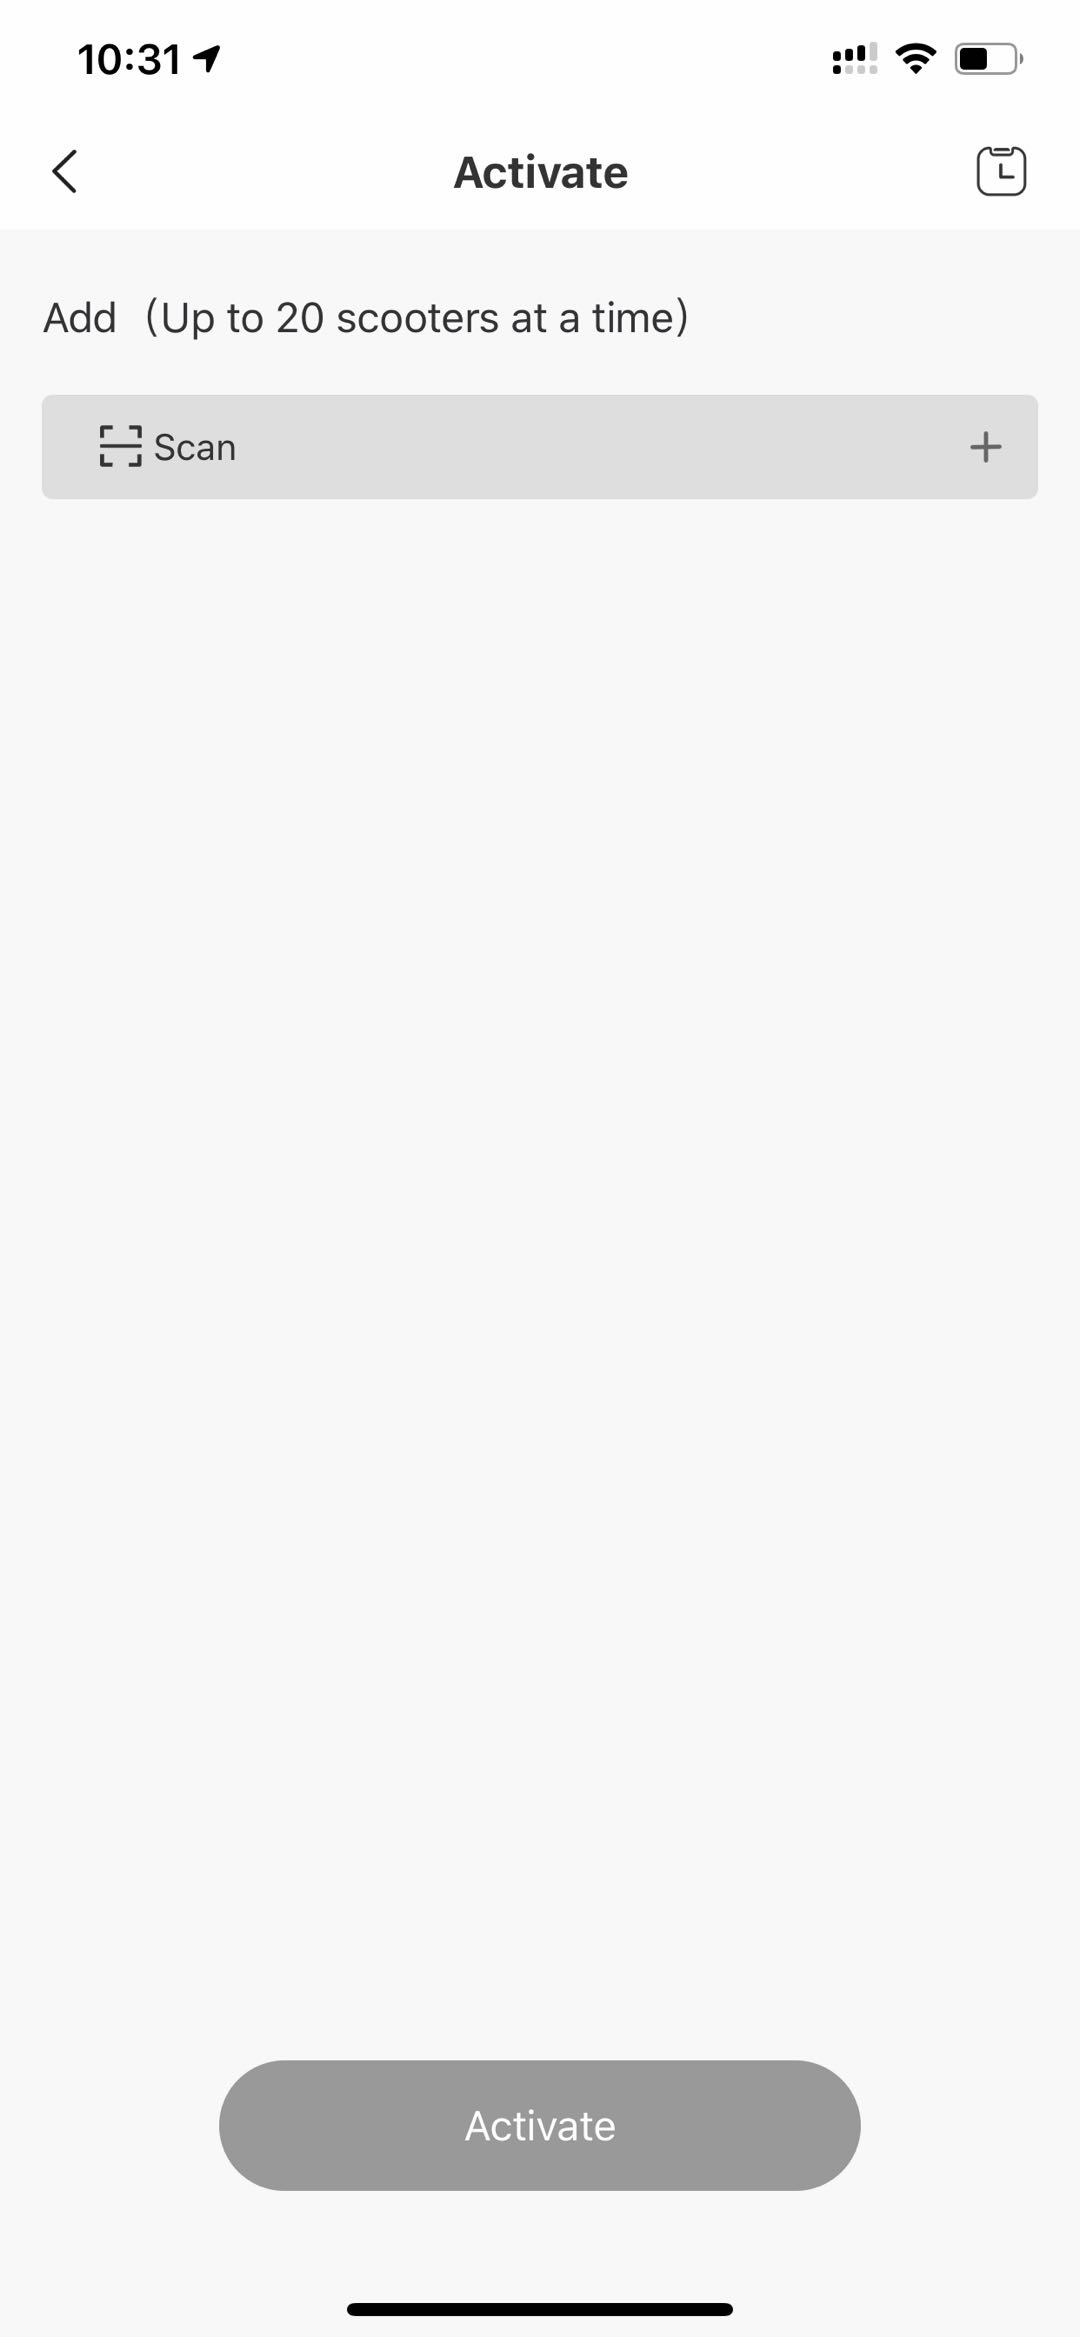
# 2. Activate a Device
Follow the steps below to activate a vehicle
- Download and use the "Segway Launcher" app to activate the device.

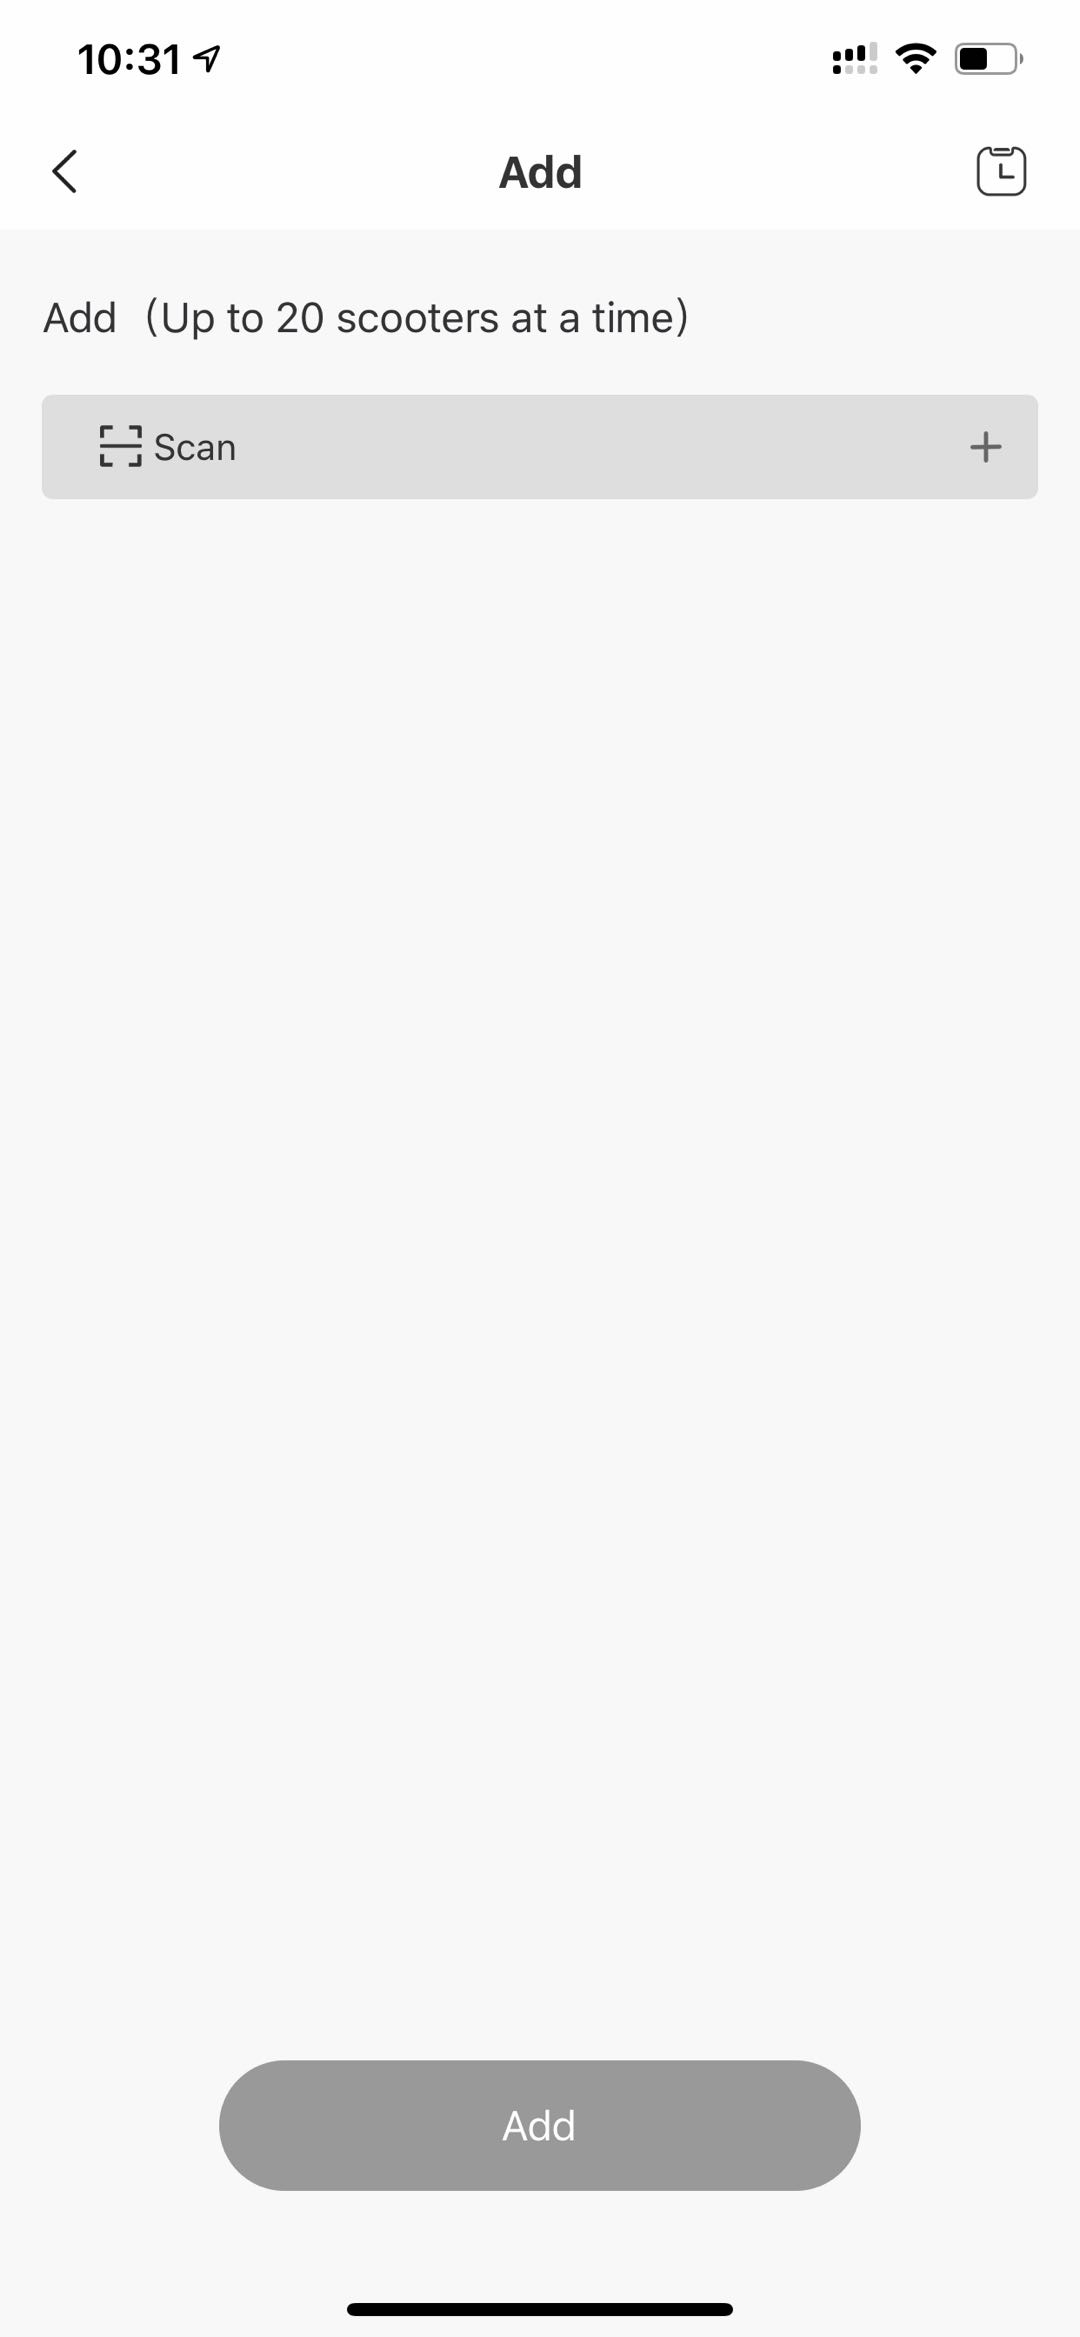
After activation, you’ll be able to see it on the device list by logging in to the backend.
Device activation can be completed from the Segway Launcher or backend.

# 3. Access the API
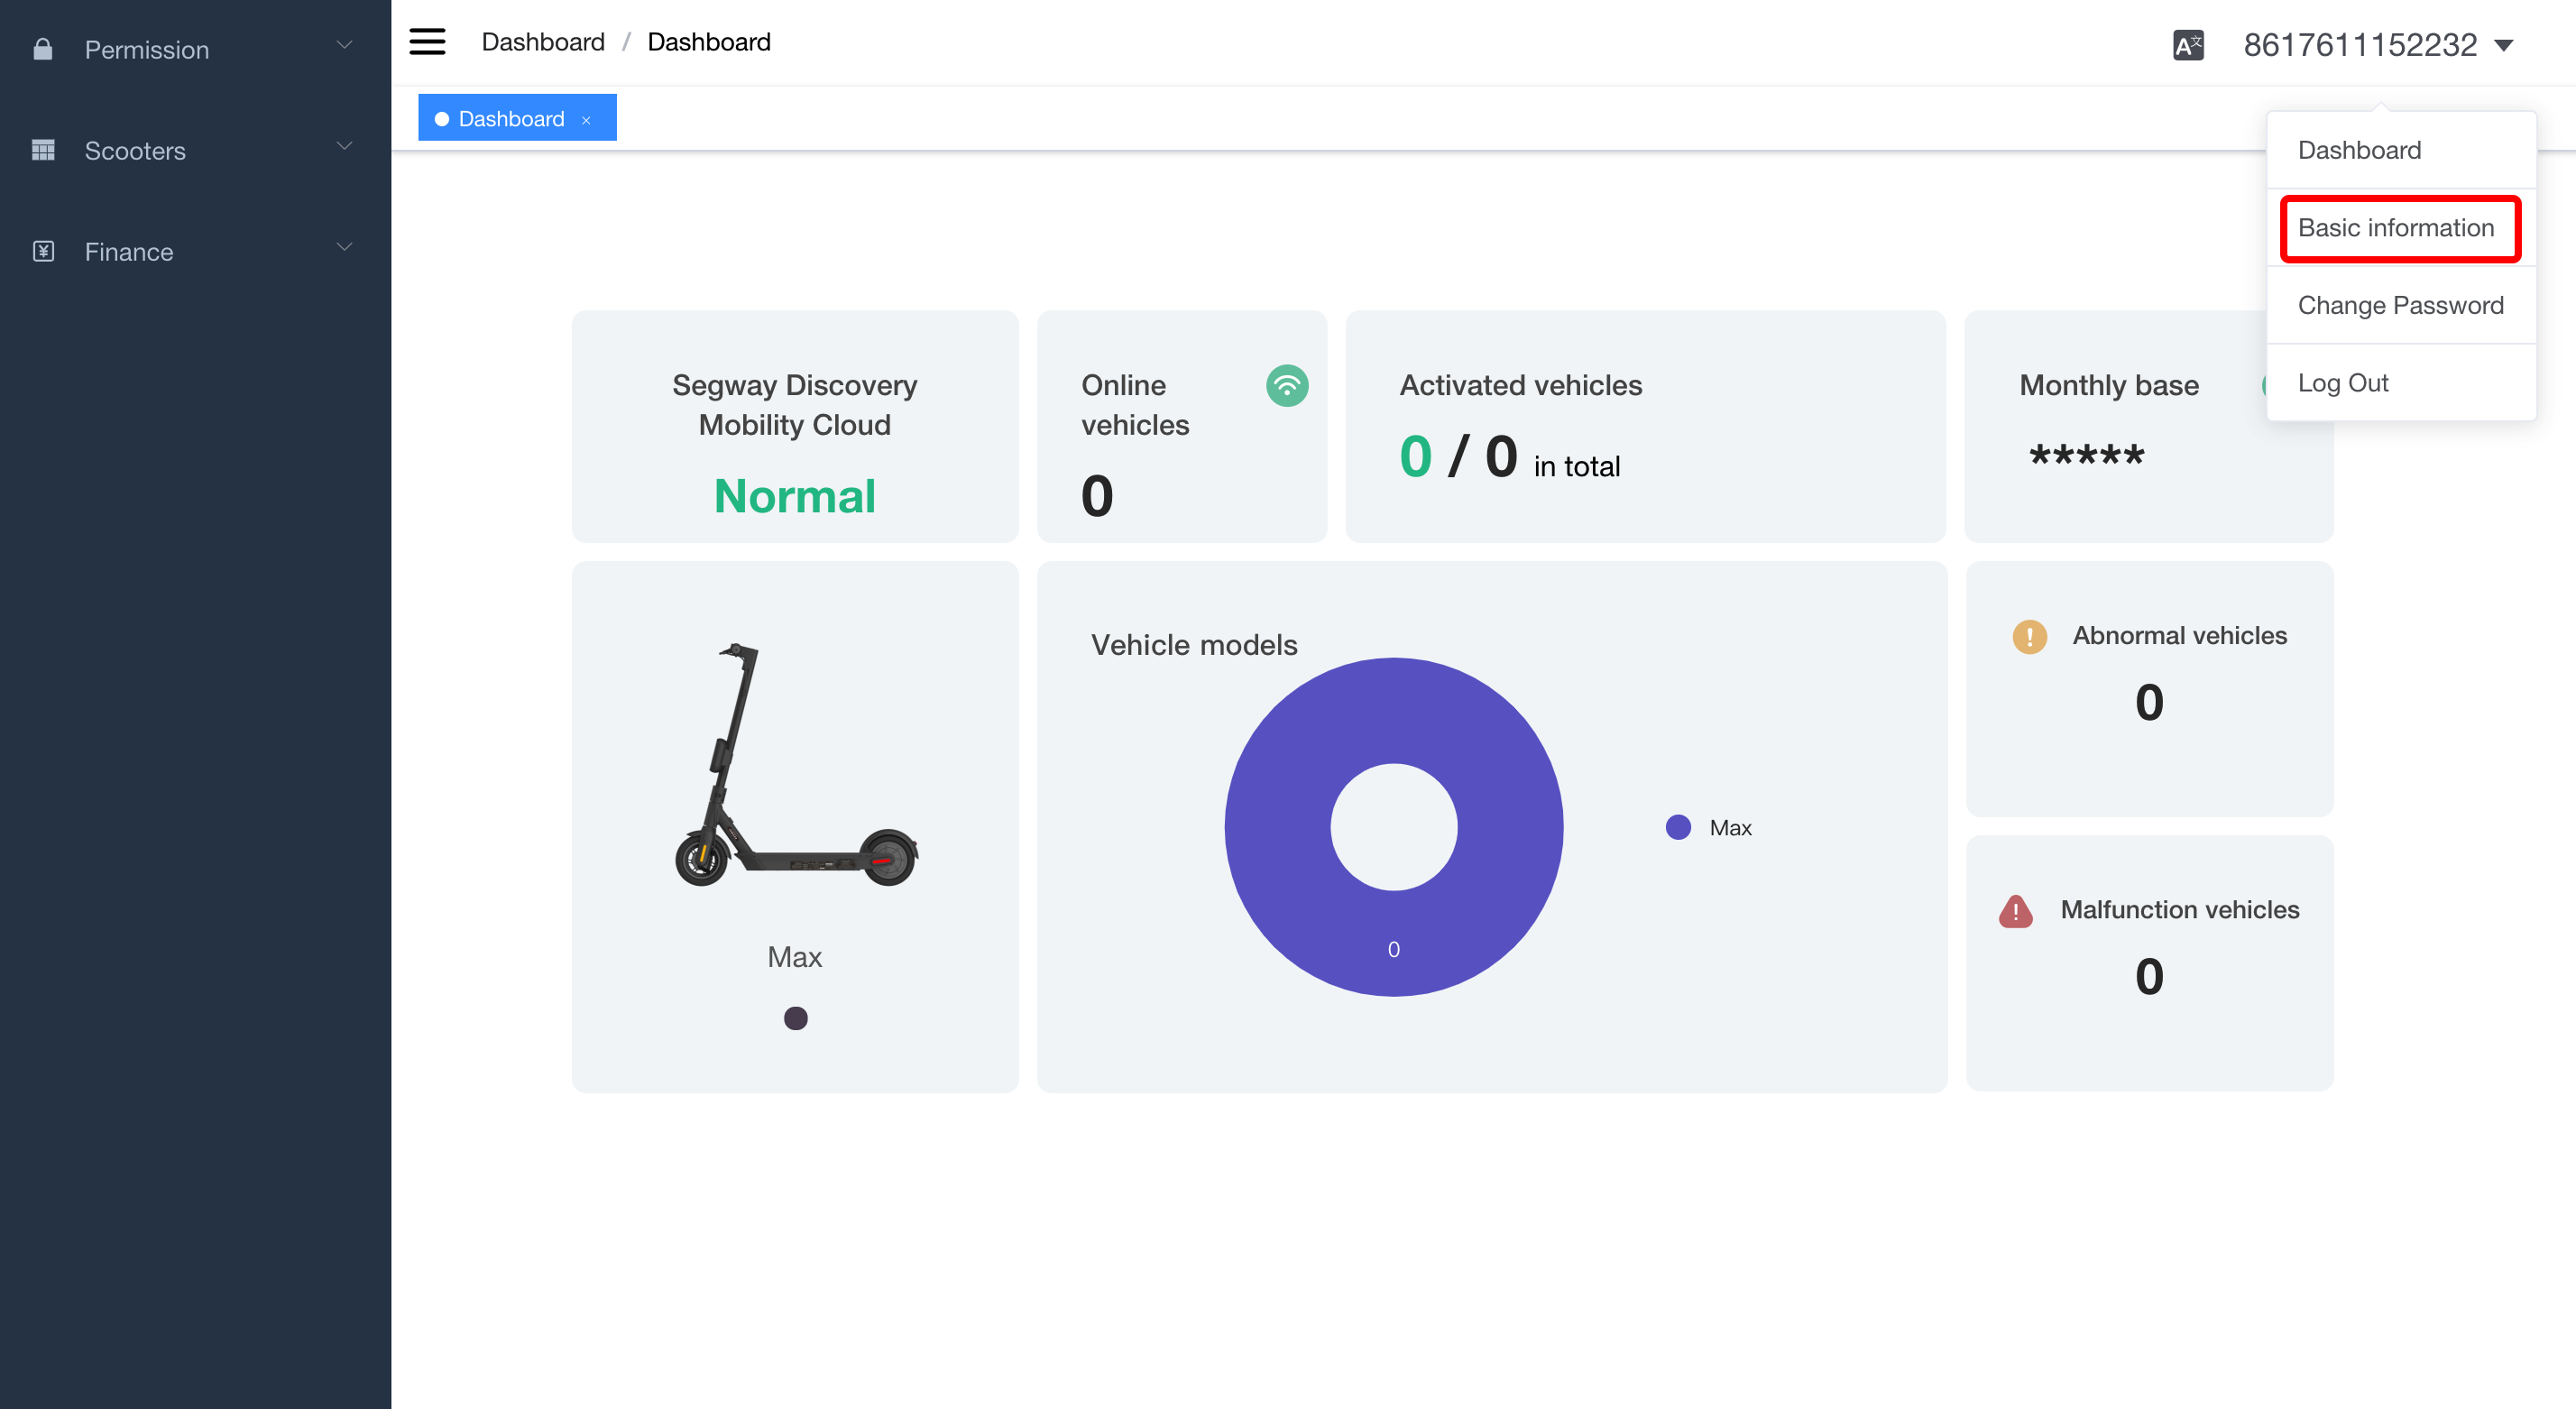
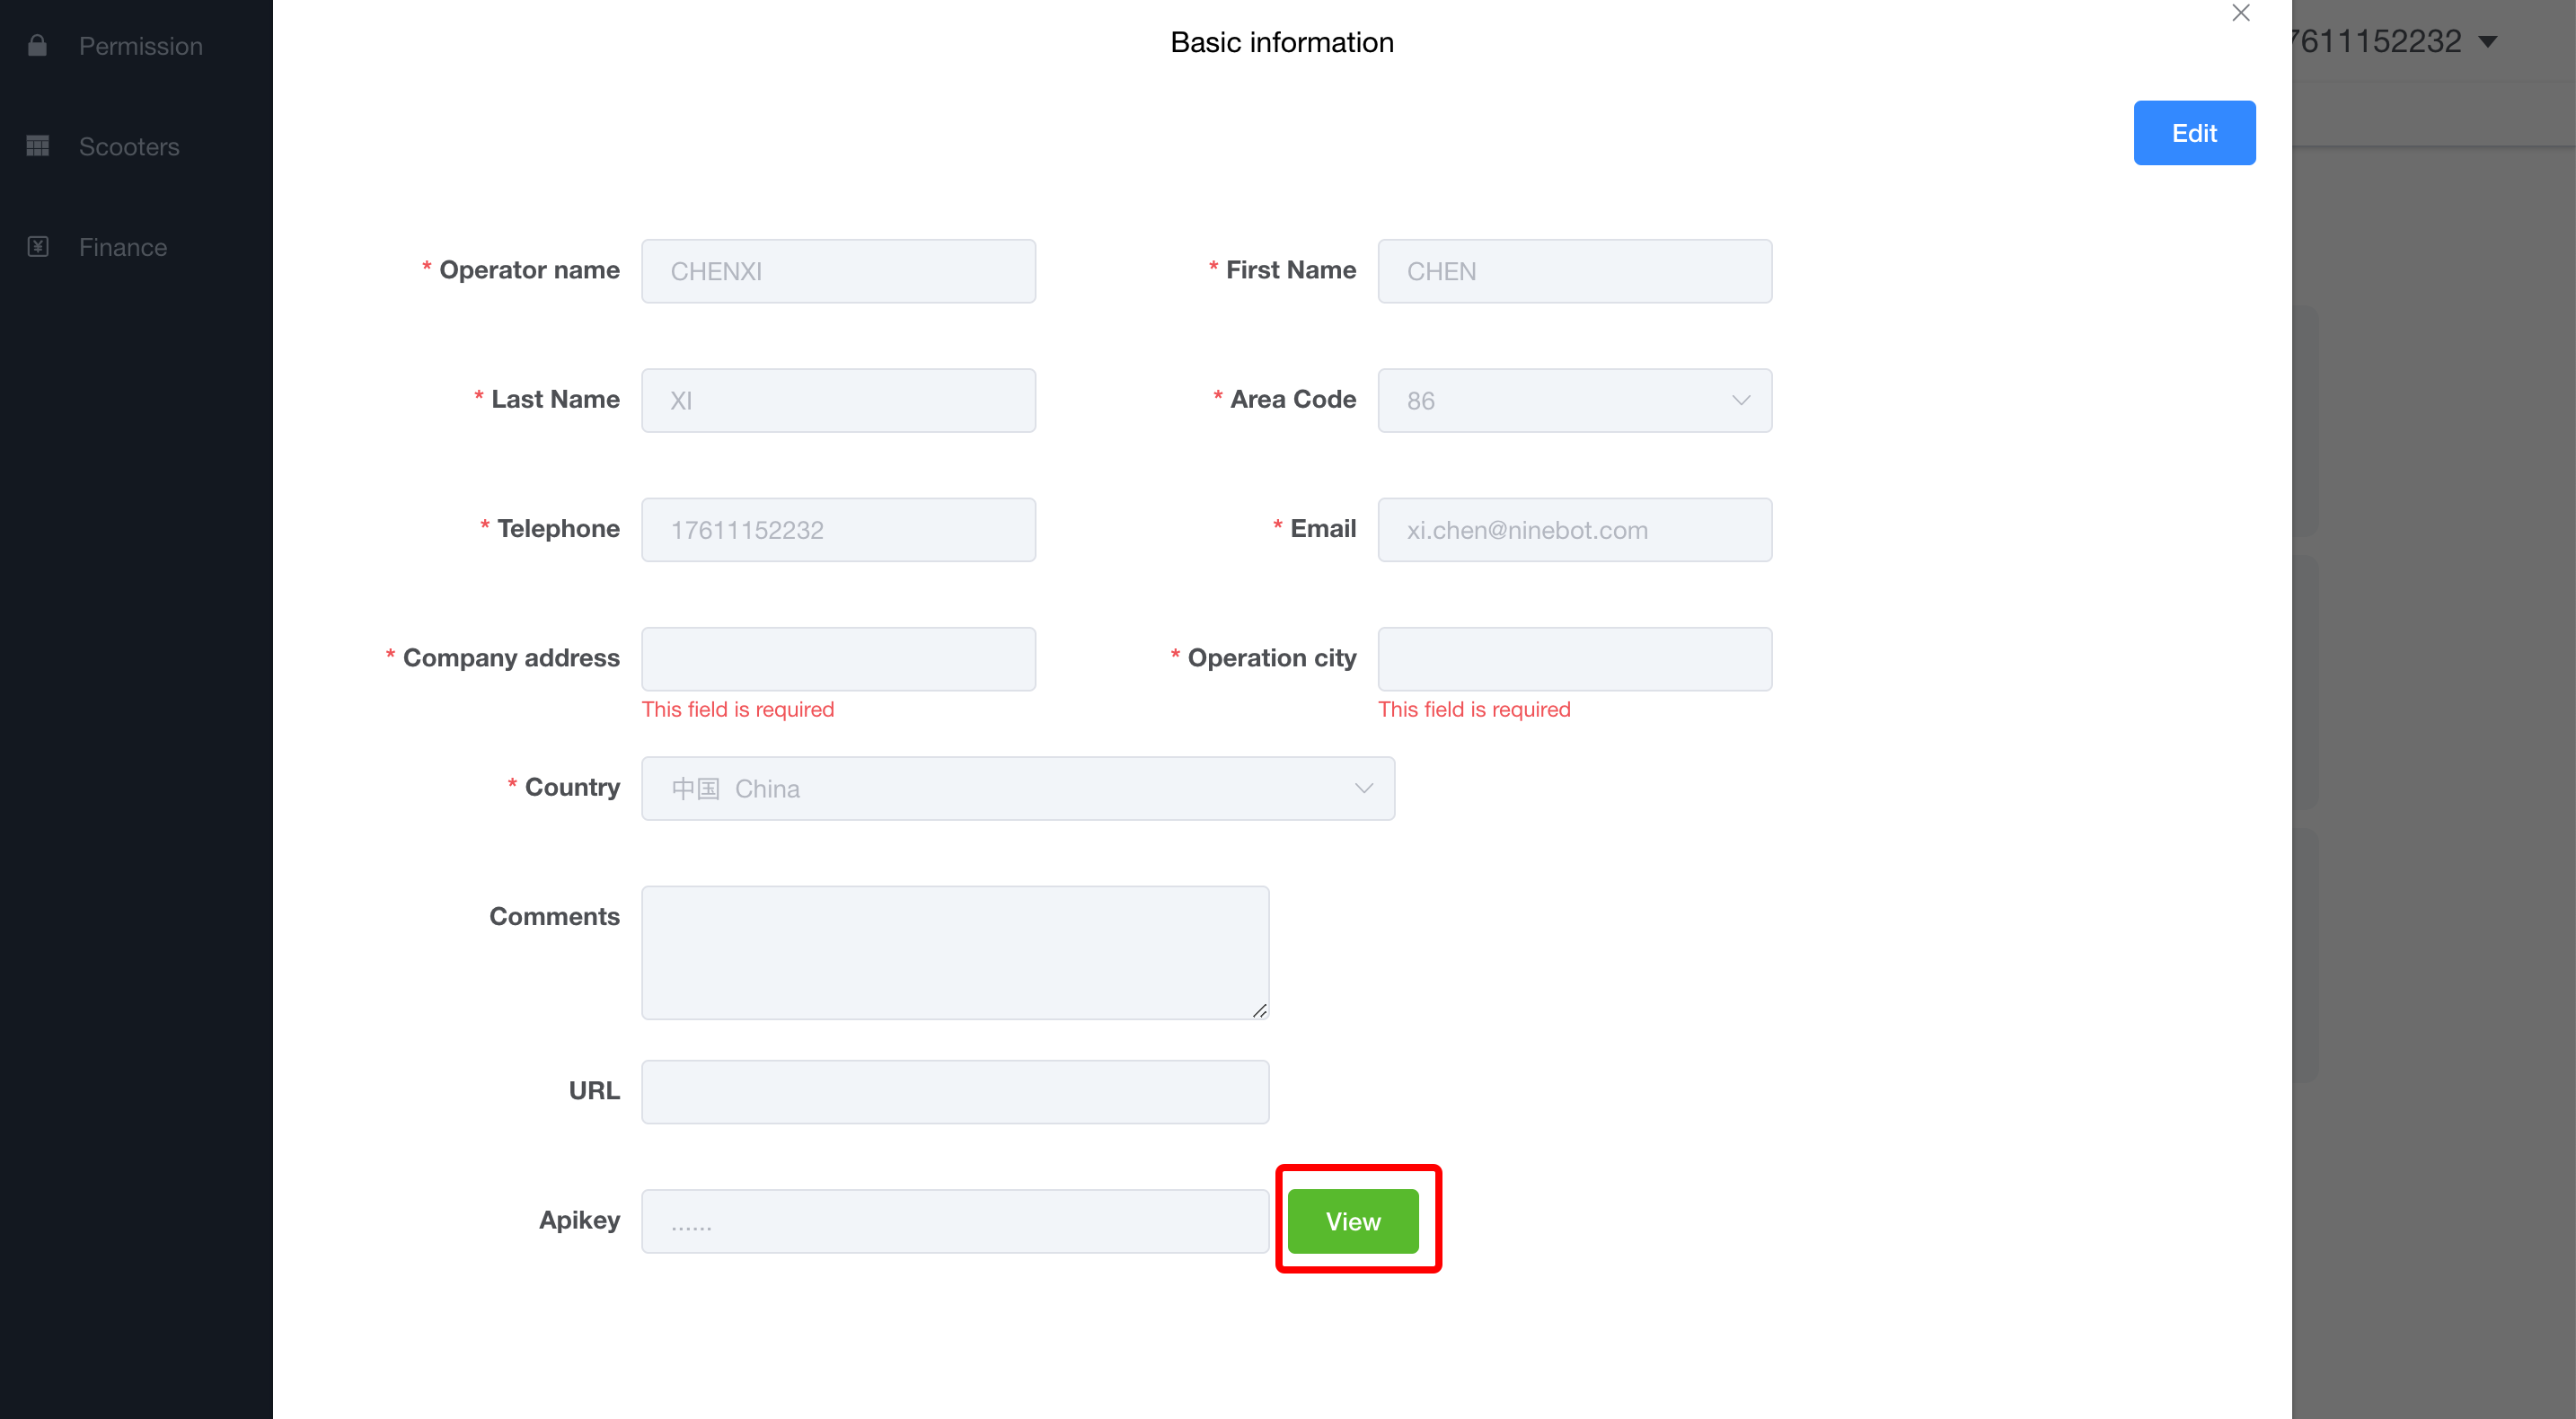
- Obtain a Key
You’ll be able to find your key in the backend.
- Push Settings
In the backend management interface, configure the base URL for push notifications.
- Call the URL
If you're not familiar with how to make API calls, please refer to API Examples in the next section. By expanding on this foundation, you will be able to create a fully functional smart scooter sharing management system.
# API Examples
This section aims to help you quickly understand the services provided by the IoT gateway, how to access it, and other matters of note. We will build a simple scooter management system to demonstrate how the API are used. Clients will be able to use the system to query, control, and maintain their smart scooter fleets.
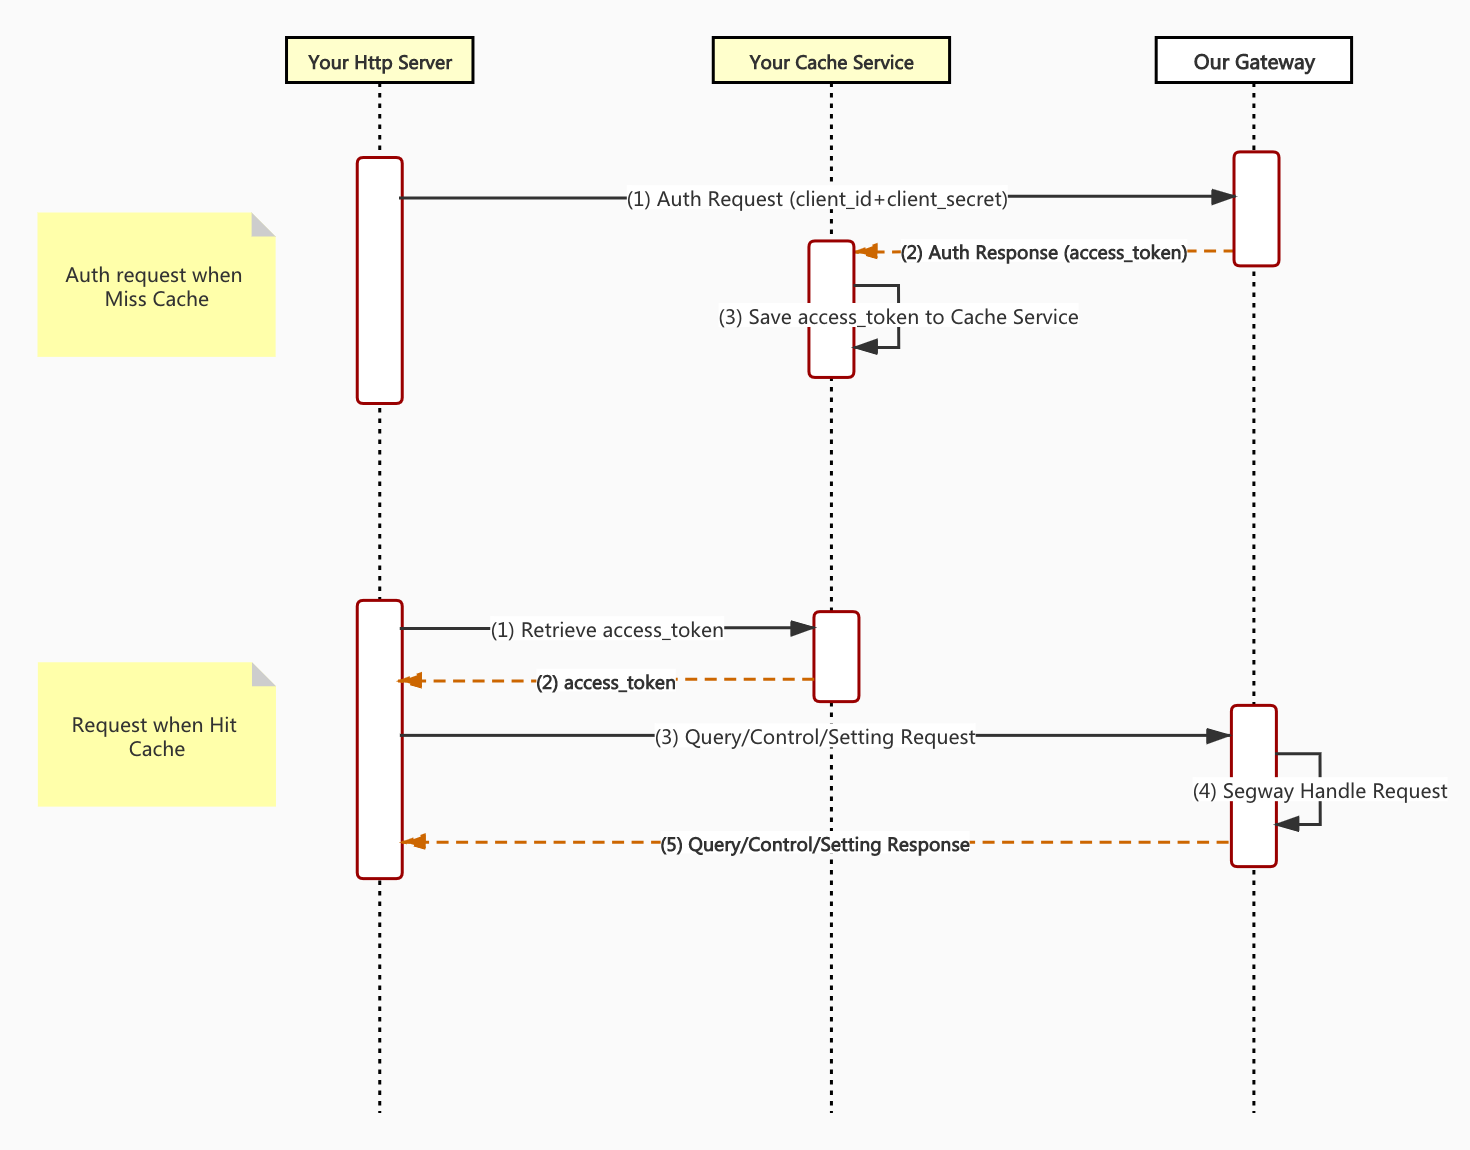
# 1. Authentication and Authorization
Prepare your client_id and client_secret, as you must pass them as parameters to /oauth/token to acquire your access_token. For the purposes of this example, suppose your client_id is L99999 and your client_secret is 88888888-4444-4444-4444-cccccccccccc.
Endpoint Name: Auth - request token
Before continuing, open the link above in a new window adjacent to the documentation. The documentation describes the method, endpoint, headers, parameters, response, and response examples for each endpoint.
All fields require parameters unless there is an optional mark next to the field name.
Our gateway distinguishes between different regions (Asia-Pacific, Europe, North America, etc.) The endpoint you should use depends on your region, which sales will outline to you. Make sure you have selected a suitable domain name.
Suppose your vehicles are in the Asia-Pacific region. A simple search will reveal that the region's request domain is: https://apac-api.segwaydiscovery.com.
Next, add the corresponding endpoint. Your full request URL should be: https://apac-api.segwaydiscovery.com/oauth/token.
Request: According to the API documentation, we will need to:
- Provide a
Content-Typerequest header with the valueapplication/x-www-form-urlencoded. - Provide a
client_idparameter. This is the value of yourclient_id, which we supposed earlier to beL99999. - Provide a
client_secretparameter. This is the value of yourclient_secret, which we supposed earlier go be88888888-4444-4444-4444-cccccccccccc. - Provide a
grant_typeparameter with the valueclient_credentials.
We can use any programming language to construct the following request to generate an access_token:
curl -X POST 'https://apac-api.segwaydiscovery.com/oauth/token' \
-H 'Cache-Control: no-cache' \
-H 'Content-Type: application/x-www-form-urlencoded' \
-d 'client_id=L99999&client_secret=88888888-4444-4444-4444-cccccccccccc&grant_type=client_credentials'
Response:
If all goes well, we will receive an access_token in the form of a JSON response like the one below:
{
    "access_token": "43d11080-511c-45f7-9c22-cd9df27283c0",
    "token_type": "bearer",
    "expires_in": 43199,
    "scope": "read write trust"
}
The JSON shows us that the validity period of the access_token is 43199 seconds (just under 12 hours). Store the token somewhere safe for future use.
# 2. Querying Vehicle Information
To make an API call to a vehicle, you will need to provide the vehicle's number. A number would have been generated during the activation process. If you've forgotten the number, refer to Quick Start - Activate a Device to look it up.
Suppose your vehicle's number is 860000000000015. We will need this and the access_token for the next step.
# Current Status
Endpoint Name: Query - get current status
Request: According to the API documentation, we should construct the following request:
curl -X GET 'https://apac-api.segwaydiscovery.com/api/v2/vehicle/query/current/status?iotCode=860000000000015' \
-H 'Authorization: bearer 43d11080-511c-45f7-9c22-cd9df27283c0'
Response: You will receive a response similar to the one below:
{
    "code": 0,
    "msg": "Success",
    "data": {
        "iotCode": "860000000000015",
        "online": true,
        "locked": true,
        "lockVoltage": 411,
        "networkSignal": 22,
        "charging": true,
        "powerPercent": 10,
        "speedMode": 1,
        "speed": 20,
        "odometer": 9000,
        "remainderRange": 3000,
        "totalRidingSecs": 110,
        "statusUtcTime": 1591067719
    },
    "t": 1593333694412,
    "opId": "3de041d2-7f1e-4cb2-a7be-483378727c56"
}
The JSON response gives you an overview of your vehicle’s state:
| Field | Value | Meaning |
|---|---|---|
| online | true | the scooter is connected to SEGWAY Cloud. |
| locked | true | the scooter is locked |
| lockVoltage | 411 | the lock voltage 411, means 4.11V |
| networkSignal | 31 | the Network Signal is good |
| charging | false | the scooter is NOT charging |
| ... | ... | ... |
# 3. Vehicle Control
When you need to unlock a vehicle, you can call the unlock port to control the vehicle.
If a user is riding a vehicle beyond your allowed range, you can warn them to turn around by calling the sound port. You can also turn off the vehicle’s throttle response by calling the corresponding port, then turn in back on after the vehicle is detected to have returned to the allowed range. These methods allow you to prevent your vehicle from exiting specified areas, reducing operating costs.
Below are examples of the API calls we have just mentioned.
# Unlock Operation
Endpoint Name: Control - unlock
Request: According to the API documentation, we should construct the following request:
curl -X POST 'https://apac-api.segwaydiscovery.com/api/v2/vehicle/control/unlock' \
-H 'Authorization: bearer 43d11080-511c-45f7-9c22-cd9df27283c0' \
-H 'Content-Type: application/json' \
-d '{
    "iotCode": "860000000000015"
}'
Response:
If successful, you will receive a response similar to the one below:
{
    "code": 0,
    "msg": "Success",
    "data": null,
    "t": 1593331167570,
    "opId": "d5aa020d-77ae-439c-892c-a781c71eb836"

}
# Play Sound - GeoFence Range Exceeded
Endpoint Name: Control - sound
Request:
According to the API documentation, we can see that the value of contentType 1 means that the scooter has been driven out of the GeoFence, which is exactly what we need. With this information, we can construct the following request:
curl -X POST 'https://apac-api.segwaydiscovery.com/api/v2/vehicle/control/sound' \
-H 'Authorization: bearer 43d11080-511c-45f7-9c22-cd9df27283c0' \
-H 'Content-Type: application/json' \
-d '{
    "iotCode": "860000000000015",
    "contentType": 1
}'
Response: If successful, you will receive a response similar to the one below:
{
    "code": 0,
    "msg": "Success",
    "data": null,
    "t": 1593333983900,
    "opId": "bf84e6aa-8787-4b2d-8461-e91aba35b07e"
}
# Throttle Off Response
Endpoint Name: Control - throttle response
Request:
According to the API documentation, controlType 0 represents something being turned off. With this information, we can construct the following request:
curl -X POST 'https://apac-api.segwaydiscovery.com/api/v2/vehicle/control/throttle-response' \
-H 'Authorization: bearer 43d11080-511c-45f7-9c22-cd9df27283c0' \
-H 'Content-Type: application/json' \
-H 'Cache-Control: no-cache' \
-d '{
    "iotCode": "860000000000015",
    "controlType": 0
}'
Response: If successful, you will receive a response similar to the one below:
{
    "code": 0,
    "msg": "Success",
    "data": null,
    "t": 1593333983900,
    "opId": "bf84e6aa-8787-4b2d-8461-e91aba35b07e"
}
# Throttle On Response
Endpoint Name: Control - throttle response
Request:
According to the API documentation, controlType 1 represents something being turned on. With this information, we can construct the following request:
curl --request POST 'https://apac-api.segwaydiscovery.com/api/v2/vehicle/control/throttle-response' \
-H 'Authorization: bearer 43d11080-511c-45f7-9c22-cd9df27283c0' \
-H 'Content-Type: application/json' \
-d '{
    "iotCode": "860000000000015",
    "controlType": 1
}'
Response: If successful, you will receive a response similar to the one below:
{
    "code": 0,
    "msg": "Success",
    "data": null,
    "t": 1593333983900,
    "opId": "bf84e6aa-8787-4b2d-8461-e91aba35b07e"
}
# 4. Vehicle Settings
You can define the following vehicle settings whenever necessary
- Instrument panel mileage display language
- Maximum speed to low, med, or high (6, 12, 18 kph)
Endpoint Name: Setting - scooter setting
Request: According to the API documentation, we should construct the following request:
curl -X POST 'https://apac-api.segwaydiscovery.com/api/v2/vehicle/setting/scooter' \
-H 'Authorization: bearer 43d11080-511c-45f7-9c22-cd9df27283c0' \
-H 'Content-Type: application/json' \
-d '{
    "iotCode": "860000000000015",
    "bssDisplay": 1,
    "lowSpeedLimit": 6,
    "mediumSpeedLimit": 12,
    "highSpeedLimit": 18
}'
Response: If successful, you will receive a response similar to the one below:
{
    "code": 0,
    "msg": "Success",
    "data": null,
    "t": 1593333983900,
    "opId": "bf84e6aa-8787-4b2d-8461-e91aba35b07e"
}
# 5. Receiving Push Notifications
We have defined a set of abnormal and error states. When the vehicle encounters abnormalities or errors, users will receive information from the vehicle’s audio, display, and indicator lights.
We will also push error messages to your server in real time. During normal operating conditions, we will also push vehicle status, location, and other information to your server periodically.
This will keep you appraised on the general situation of your entire fleet and save you the hassle of having to call each individual vehicle to check its status.
Do not forget to return a success status to our server when you receive and store this data. If our server does not receive a success message, it will keep attempting to send the data until it receives a success response or reaches the maximum number of attempts.
The push process is explained in Configuring a Push URL and Scope of Functions - Real-time Data. For more details, refer to the Push section of the API documentation.
Suppose your base URL for receiving push notifications is https://hooks.yourdomain.com. According to the endpoint documentation, the push notifications should be sent to the base URL as follows:
| Notification Type | Endpoint | Push URL |
|---|---|---|
| vehicle alert | /v2/vehicle/alert | https://hooks.yourdomain.com/v2/vehicle/alert |
| vehicle status | /v2/vehicle/status | https://hooks.yourdomain.com/v2/vehicle/status |
| ... | ... | ... |
# Alert Message
Endpoint Name: Push - vehicle alert
Suppose vehicle 860000000000015 is moved while in a locked state. We know that this move is not allowed because the value of code is 1. Therefore, we will push the following data to your server:
Request:
curl --request POST 'https://hooks.yourdomain.com/v2/vehicle/alert' \
-H 'Content-Type: application/x-www-form-urlencoded' \
--data-urlencode 'iotCode=860000000000015' \
--data-urlencode 'platformCode=L99999' \
--data-urlencode 'statusUtcTime=1591067719' \
--data-urlencode 'code=1' \
--data-urlencode 'signature=726b168d5880a323790ac1c945dd63bd'
or
curl -X POST https://hooks.yourdomain.com/v2/vehicle/alert \
-H 'Content-Type: application/x-www-form-urlencoded' \
-d 'iotCode=860000000000015&platformCode=L99999&statusUtcTime=1591067719&code=1&signature=726b168d5880a323790ac1c945dd63bd'
Both of these expressions are equivalent.
TIP
Note that the content of the request body is not a JSON string, but a www-form-urlencoded string. This is to ensure that signature verification operations do not depend on minor differences caused by JSON conversion. More details on signature verification can be found here.
When your server receives a request, it must first verify the signature. If the signature is verified, save the request and return the expected status.
HTTP/1.1 200 OK
{
    "code": 0,
    "message": "success"
}
The push notification process ends here. After this, your server can handle the alert in accordance with your operational requirements.
# 6. And much more ...
Congratulations, you have created a simple scooter management system.
Read at the RESTful API to find out more about available endpoints and methods...
# Extensional Instructions
# 1. Authentication and Authorization
Our server uses OAuth2.0 (RFC 6749) for authentication and authorization of credentials and resources. Please note the following:
- Client Credentials
TIP
We use client credentials to issue your access_token. This means that the value of grant_type is fixed to client_credentials. We authenticate the back-end server, not front-end users (such as a rider). This means that anyone with a valid access_token will be able to access devices that belong to you. As such, make sure your access_token is stored on a trusted server and is only disclosed to trusted parties.
- Highest permission
access_token
TIP
You will note that scope is not required when generating an access_token. The default value of scope is "read write trust", which means that the generated access_token has the highest level of permissions of all your devices.
# 2. Push Notifications
- Signature generation algorithm
Note: All received parameters except signature are involved in the signature-generation process.
Step 1: If the received data is a string, use & and = to split the string into several key-value pairs. If the received data is an array, dict, or similar data type, continue as usual and order the received key-value pairs sequentially by ASCII
Step 2: Convert the sorted dict back into a string in “key1=value1&key2=value2” form
Step 3: Append “&client_secret=YOUR_SECRET” to the string created during step 2.
Step 4: Use MD5 to calculate the hash value (finally converted into 32-bit hexadecimal characters) of the string created during step 3. The newly calculated value is your digital signature.
Next, compare this value with the signature you received. If they are the same, the signature verification was successful.
- When performing signature verification, do not enumerate the signature fields according to the API documentation list.
All received parameters except signature are involved in the signature-generation process. When performing signature verification, do not enumerate the signature fields according to the API documentation list. This will cause use many problems if new fields are created.
# 3. Vehicle Model and Endpoint
Our platform support ES, Max, T60 scooters,Ebike C80 and Mopeds. Different vehicles will have different functionalities, so endpoints may differ slightly depending on the vehicle model. Care about this please.
# Best Practices
# Cache the access_token
The access_token is the globally unique credential for calling APIs. It is required for calls to all APIs.The access_token is valid for 24 hours and needs to be updated periodically. However, please do not refresh token frequently.
- The validity period of access_token is expressed in the returned expires_in, and its available value is within 86400 seconds. Your server needs to update access_token in advance based on this validity period. During the update, your server may continue to output old access_token values. In this case, we will ensure that both new and old access_token values are available within 300 seconds(expires_in≤300), so that third-party services are smoothly transitioned.
- The validity of access_token may be adjusted in the future. Therefore, your server not only needs to actively update access_token on schedule, but also provides an API for passive update of access_token. In this way, when learning that access_token is expired or received an “invalid_token” in a call, the service server may trigger the update procedure for access_token.
# Store Pushed Content
Push ensures that you do not have to keep constant track of each individual vehicle, but instead only query during specific incidents or for specific data. As such, it is necessary to store pushed content.
# Call GET to Obtain Real-time Status Data Only When Necessary
We will periodically Push you data in accordance with your vehicle’s current status. This includes connection status, lock status, charge status, power, max speed, current speed, longitude, latitude, altitude, and more.
The default push interval should suffice for most application scenarios. However, if you feel the interval does not match your operational requirements, you can obtain real-time data by calling the GET endpoint.
# Do Not Perform High-Frequency Vehicle Operations
“Vehicle operations” refers to operations that can be perceived by observing the vehicle (such as locking and unlocking, switching the lights on or off, playing sounds, etc.)
Executing these operations (locking and unlocking in particular) takes time, as after the command is sent to the IoT portal, it must be communicated it to the vehicle, which must then perform the hardware operation by writing to memory. Finally, a response must be sent to the calling party.
After factoring in network latency (the time it takes for a command to travel from your server to our gateway server, then to IoT parsing and conversion), the entire process could take anywhere between 2-10 seconds. If the vehicle is in a location with poor signal, this may take longer. In addition, some operations (such as locking and unlocking) must be executed using multiple commands to the gateway server.
Frequent operations (e.g. once every 10 seconds) are also detrimental to the vehicle's lifecycle, and concurrent (multiple within a second) lock/unlock operations may cause unexpected behavior.
As such, we recommend only executing vehicle operations when necessary. For example, if you don’t know the lock status of a vehicle but want to make sure it's locked, we recommend you first call Query - get current status to check its lock status.